Remotely Debug ARM Cortex with Segger Tools
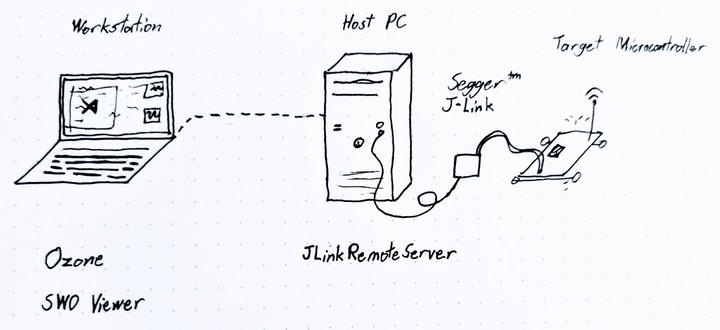 Workstation -> Host/Server -> JLink -> Target
I recently discovered that SEGGER’s debugging tools can be used remotely! Refer to the official documentation for more details, but here my quick-start notes…
Install
My “server” machine is an Ubuntu 18.04 desktop across the room in the closet where I have my little electronics bench set up. I’ll need the JLink package installed on that system. The latest JLink version is v7.54a as of writing, but if you didn’t know, SEGGER updates their software quite frequently so be sure to check their website for any updates & bug fixes.
I use a curl request, instead of a simpler wget, in order to auto-accept the Terms of Use.
user@server:~$ curl -X POST -F 'submit=Download+software' -F 'accept_license_agreement=accepted' https://www.segger.com/downloads/jlink/JLink_Linux_V754a_x86_64.deb --output JLink_Linux_V754a_x86_64.deb

user@server:~$ sudo apt install ./JLink_Linux_<version>.deb
Reading package lists... Done
Building dependency tree
Reading state information... Done
Note, selecting 'jlink' instead of './JLink_Linux_V754a_x86_64.deb'
The following NEW packages will be installed:
  jlink
[ ... ]
Preparing to unpack .../JLink_Linux_V754a_x86_64.deb ...
Removing /opt/SEGGER/JLink ...
/opt/SEGGER/JLink not found (OK)
Unpacking jlink (7.541) ...
Setting up jlink (7.541) ...

user@server:~$ command -v JLinkRemoteServerCLExe
/usr/bin/JLinkRemoteServerCLExe
Cool, the remote server executable is avaliable. Now I need to poke a hole in my firewall to allow incoming connections. Don’t have a firewall setup yet? Well you should, and it’s not hard on Ubuntu 18. In fact, I’m on a fresh install of Ubuntu so mine isn’t enabled yet either. Let’s do that first.
A related tutorial: https://www.digitalocean.com/community/tutorials/how-to-set-up-a-firewall-with-ufw-on-ubuntu-18-04
user@server:~$ sudo ufw status verbose
Status: inactive

user@server:~$ sudo ufw default deny incoming
user@server:~$ sudo ufw default allow outgoing
user@server:~$ sudo ufw logging on
user@server:~$ sudo ufw allow OpenSSH
user@server:~$ sudo ufw allow 19020/tcp comment 'JLinkRemoteServer'
user@server:~$ sudo ufw show added
Added user rules (see 'ufw status' for running firewall):
ufw allow OpenSSH
ufw allow 19020/tcp comment 'JLinkRemoteServer'

user@server:~$ sudo ufw enable
Command may disrupt existing ssh connections. Proceed with operation (y|n)? y
Firewall is active and enabled on system startup
Alrighty, now to try it out!
Use
-
Connect your JLink debugger to the target microcontroller.
-
Connect your JLink debugger to the server computer, via USB.
-
Start
JLinkRemoteServeron the serverSEGGER J-Link Remote Server V7.54a Compiled Sep 7 2021 14:27:16 'q' to quit '?' for help Connected to J-Link with S/N {{my-jlink-serial-number}} Waiting for client connections... -
Open Ozone (on the client machine)
-
Choose chip model and core type
-
Choose connection settings. In this example, I’m connecting to the server I just set up, so I’m going to use that server’s IP address.
-
Select your compiled binary.
-
Use as normal!
SEGGER SWO Viewer with Remote Debugger
The SWO Viewer should work remotely too! This is a short example showing how I’d invoke this on the (Windows CMD) command line:
JLinkSWOViewer.exe -ip 192.168.1.123 -device MIMXRT1021DAG5A -swofreq 921600
Alex Hogen
Embedded Firmware Engineer
My interests include music, embedded networking, and automated testing.